1. Open Logic Pro X.
2. In Logic Pro X menu select Settings and then Plug-In Manager.
3. Locate and select the plug-in.
4. Click Reset & Rescan Selection.
 Nuendo 14 and Cubase 14
2. Under the Studio menu, click VST Plug-In Manager.
4. Click the Blocklist tab and click the Refresh icon.
Cubase 8.x
1. Open Cubase.
2. Go to the Studio menu -> VST Plug-in Manager, click Reset (X) Icon.
* If you don't see it click the Settings Icon near the (i)nformation icon.
3. Quit Cubase and Relaunch.
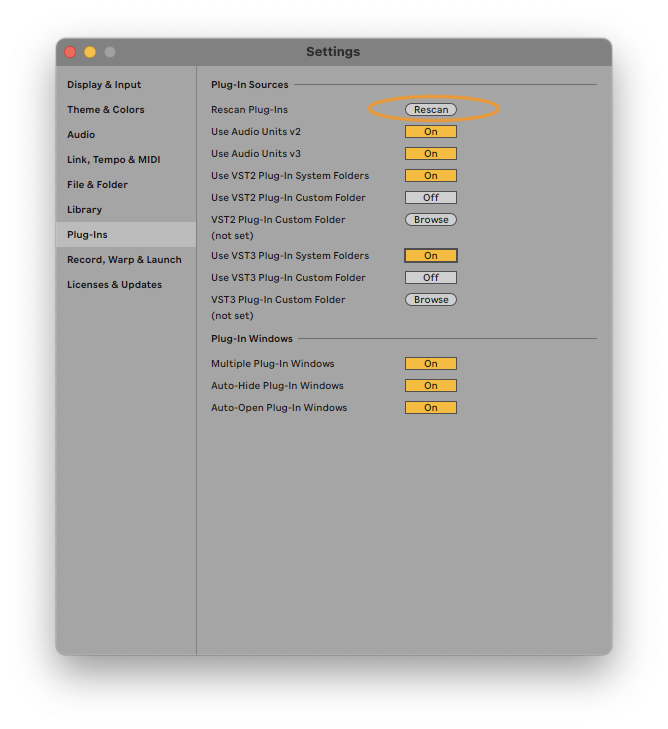
Ableton Live
1. Open Ableton Live.
2. Select Settings (Mac: under Live menu, Windows: under Options menu).
4. Make sure
'Use VST2 Plug-Ins System Folder',
'Use VST3 Plug-Ins System Folder',
'Use Audio Units v2', and 'Use Audio Units v3' are On.
1. Open Studio One. Go to Studio One > Options (Windows) or Studio One > Preferences (Mac). Click Locations → VST Plug-Ins.
2. In the same window, make sure Scan at startup is checked.
3. Click Reset Blacklist -> Yes.
4. Clock Ok to save.
5. Close Studio One and reopen it.

Windows:
Navigate to C:\Users<username>\AppData\Roaming\PreSonus\Studio One 7.
Grab the x64 folder and move it to your desktop.
Launch Studio One — it should rescan your plug-ins.
After you load a project and everything works as it should, you can delete the x64 folder from your desktop. Studio One creates a new one after the plug-ins scan.
Open a new Finder window.
Click on the Go menu in the menu bar.
Hold down the ⌥ (Option/Alt) key — the User Library will appear in the menu. Click it.
In the Library, navigate to: Application Support/PreSonus/Plug-in Scanner.
Grab the Arm64 folder and move it to your desktop.
Launch Studio One — it should rescan your plug-ins.
After you load a project and everything works as expected, you can delete the Arm64 folder from your desktop. Studio One creates a new one after the plug-ins scan.
Mac (Intel):
Open a new Finder window.
Click on the Go menu in the menu bar.
Hold down the ⌥ (Option/Alt) key — the Library will appear in the menu. Click it.
In the Library, navigate to: Application Support/PreSonus/.
Find the x64 folder and move it to your desktop.
Launch Studio One — it should rescan your plug-ins.
After you load a project and everything works as expected, you can delete the x64 folder from your desktop. Studio One creates a new one after the plug-ins scan.
REAPER:
1. Open REAPER
2. Click on the REAPER menu -> Settings.
3. Open Plug-Ins -->VST from the left list.
4. Click re-scan --> Clear cash and re-scan VST paths for all plugins.
* When using resurrected plug-ins make sure they don't have (x86) suffix which is used only by REAPER's own bridge.

 Digital Performer 11:
1. Open Digital Performer 11.
4. Make sure the Primary External Plug-in Format is set correctly.
5. Select the plugins that have been unexamined or have failed validation and click 'reexamine'.

FL Studio
1. Open FL Studio.
2. Go to the top menu, click Add, and select Manage plugins
3. Look at the Plugin search paths on the left. Ensure the folder where you installed your new plugin is listed there.
-- If the folder is missing: Click the Folder icon (+) to browse and add the correct directory.
4. Click Start scan (or Find installed plugins).
5. Wait for the scan to finish. Your new plugins will appear in the list, highlighted in yellow.
6. To use the plugin, you can now select it from the list or go to the Mixer, click a slot, select More plugins, and find it there.

Was this article helpful?
That’s Great!
Thank you for your feedback
Sorry! We couldn't be helpful
Thank you for your feedback
Feedback sent
We appreciate your effort and will try to fix the article